Copernica (EN)
- vTranslator
- Miranda Blom
With the Copernica link you can synchronize data between Squeezely and the Email Service Provider (ESP) Copernica. Audiences, profiles, triggers and product sets from Squeezely can be sent to Copernica through this link.
Implementation
For the implementation of the Copernica link:
![]() /wiki/spaces/SG/pages/1723727884
/wiki/spaces/SG/pages/1723727884
By completing the full implementation, email addresses and newsletter consents will be synchronized once between Copernica and Squeezely. Also, profile fields from Squeezely will be synchronized to Copernica. After the link has been made, the following data will be synchronized:
Email addresses: New email addresses will be synchronized real-time between Squeezely and Copernica
Consent: Changes to newsletter consents will be synchronized in real time between Squeezely and Copernica
Profile fields: Through Squeezely audiences & journeys, profile fields are sent from Squeezely and stored in Copernica
Audiences & Profiles
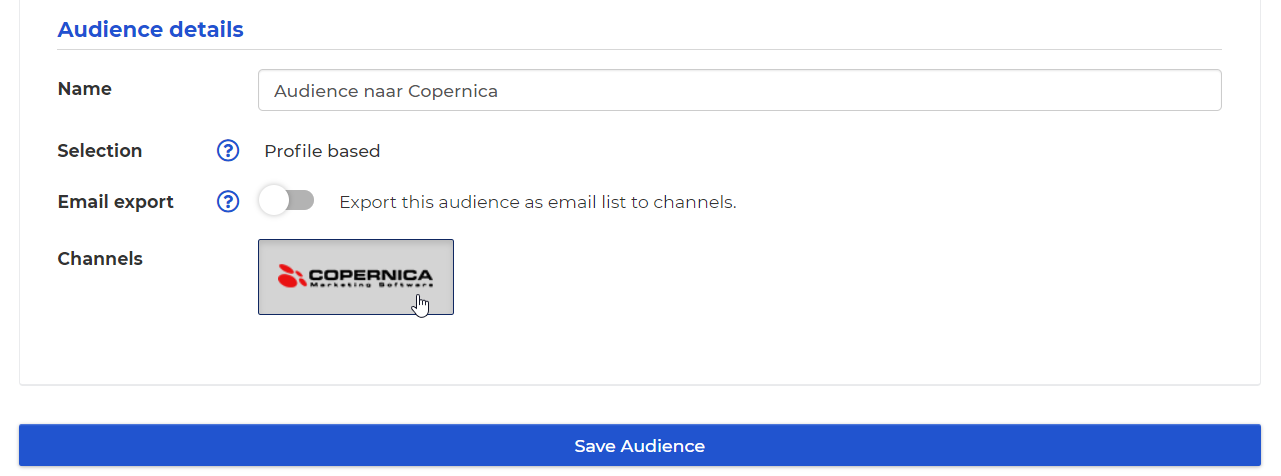
In the Audience Builder you can send audiences to Copernica by selecting Copernica as Channel:
For the profiles in the audience, Squeezely creates two subprofiles in Copernica:
Squeezely audiences: In the collection Squeezely_audiences, Squeezely adds a subprofile. On this subprofile, the profile fields and audiences of the profile will be updated in Copernica.
In Copernica, the API call will be processed under 'Squeezely audiences' in the subprofile:
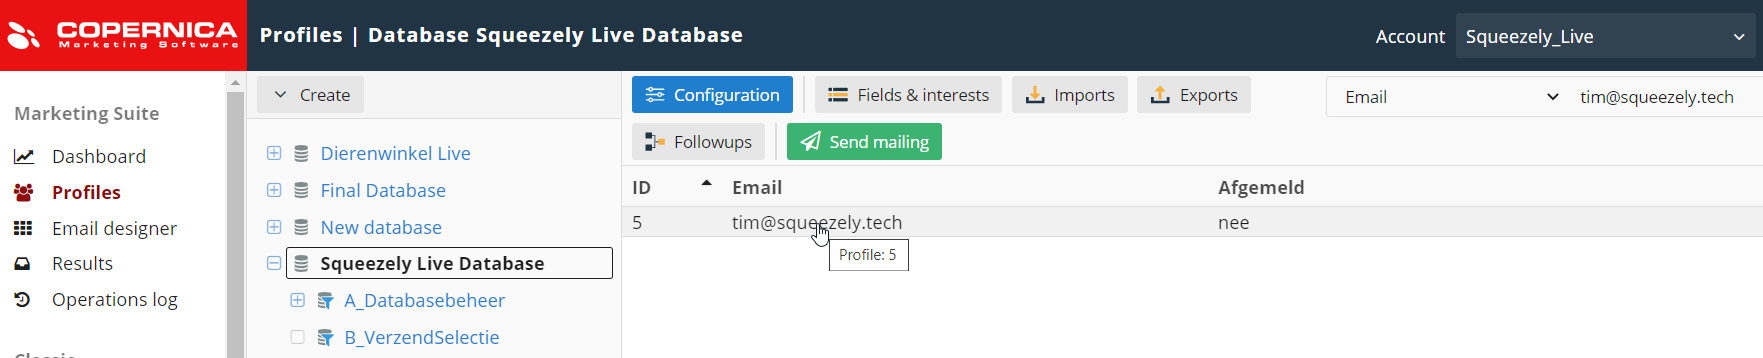
In Copernica, go to 'Profiles'.
Open the Copernica database that Squeezely synchronizes data with
Click on a profile from the audience you want to check

Go to 'squeezely_audiences' under 'Subprofiles

Click on the profile
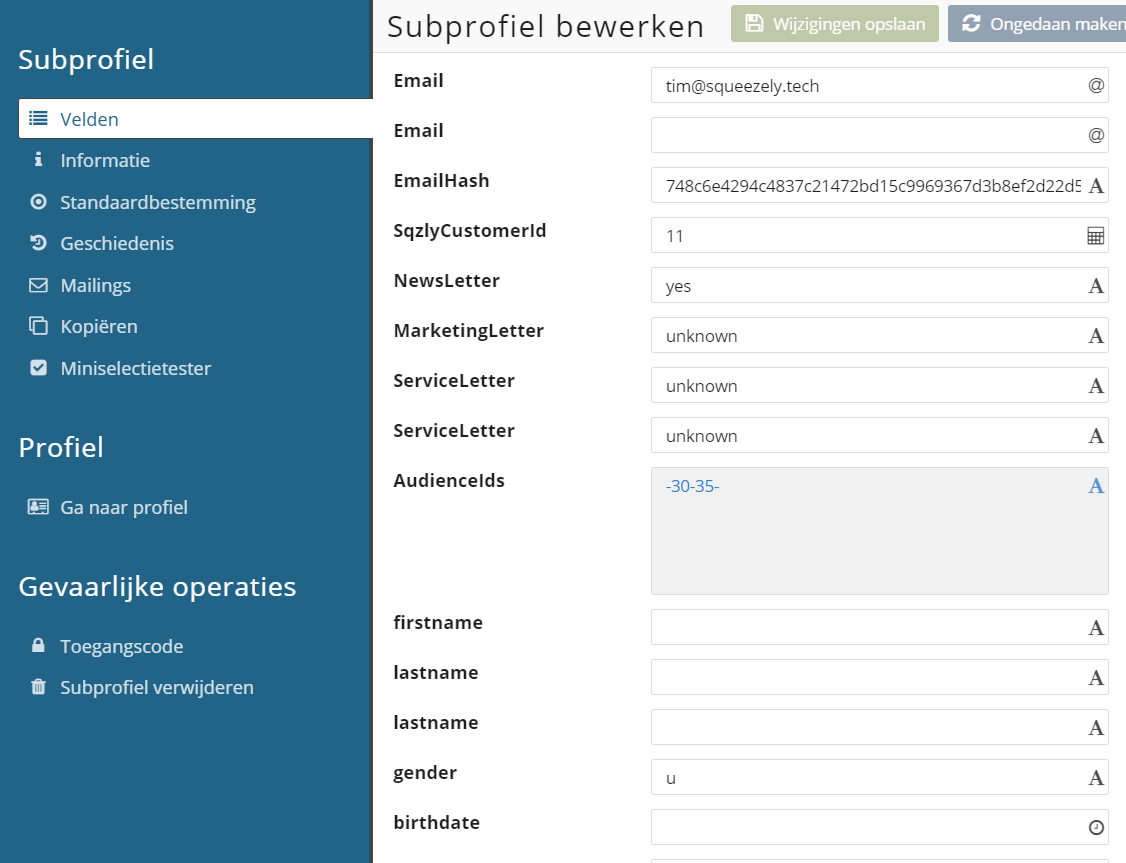
In this overview you will see the profile fields and audiences of the profile.
Squeezely triggers: In this collection, Copernica subprofiles (among other things) will keep track of the changes in the audiences of the profile in Copernica.
In Copernica the API call will be processed under 'Squeezely triggers' in the subprofile:
In Copernica, go to 'Profiles'.
Open the Copernica database that Squeezely synchronizes data with
Click on a profile from the audience you want to check
Go to 'squeezely_triggers' under 'Subprofiles
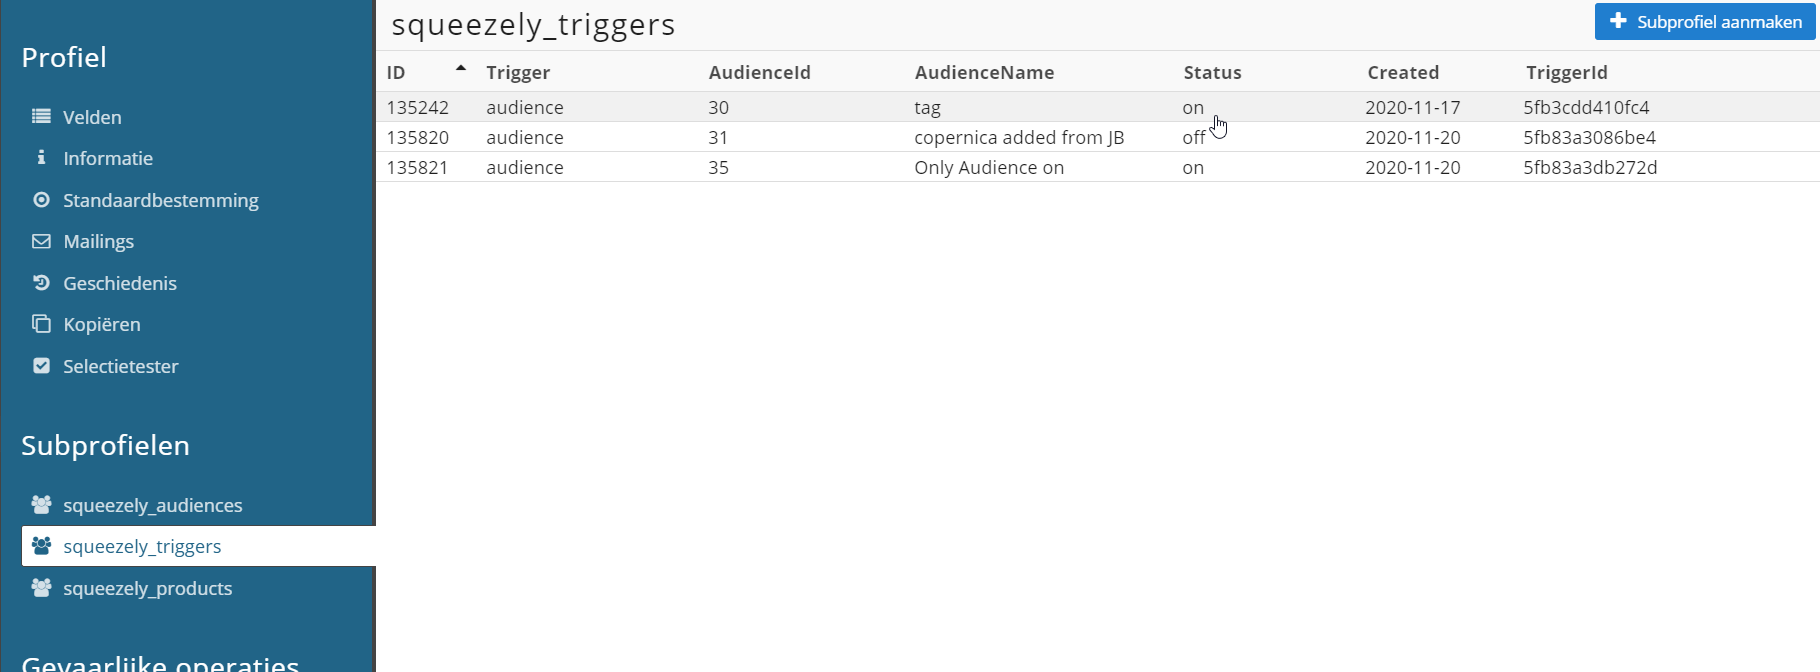
In this overview you will see the following:
ID: the unique trigger id
Trigger: in case of audience modification this is indicated as 'audience'.
AudienceId: the id of the audience in Squeezely
AudienceName: the name of the audience in Squeezely
Status: the audience status of the profile
On: The profile is added to the audience
Off: The profile is deleted from the audience
Created: the time of the trigger
Triggers & Productsets
In the Journey Builder you can send triggers to Copernica using the E-mail trigger:

In the E-mail trigger there are two options:
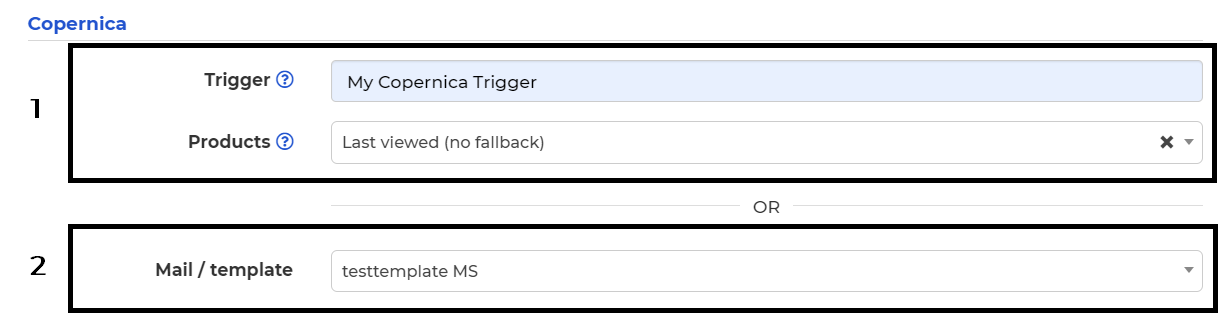
1. Sending a trigger
In the 'Trigger' field you can attach a label to the trigger that will be used to send a subprofile to the 'Squeezely triggers' collection in Copernica. Based on this label, you can set follow-up steps in Copernica. When profiles reach the email trigger and meet the conditions, Squeezely will add the label to the profiles in Copernica.
You can check the status of the trigger in Squeezely as follows:
Go to 360° Profilesin Squeezely
Find the profile that has reached the email trigger in the journey
Go to 'Automations' in the profile
In this overview you will see the following:
Created at: the time when the trigger was created
Contact id: the ID of the profile in question
Campagin/Journey ID: the ID of the specific journey
Buffer endtime: the time at which the trigger was sent to Copernica
Handled: whether the trigger has been handled in Squeezely
Sent: whether the trigger has been sent to Copernica
Channel: the channel that is triggered
In Copernica the API call will be processed under the 'Squeezely triggers' collection in a subprofile:
In Copernica, go to 'Profiles
Open the Copernica database that Squeezely synchronizes data with
Click on a profile with the concerning trigger that you want to check

Go to 'Squeezely_triggers' under 'Subprofiles
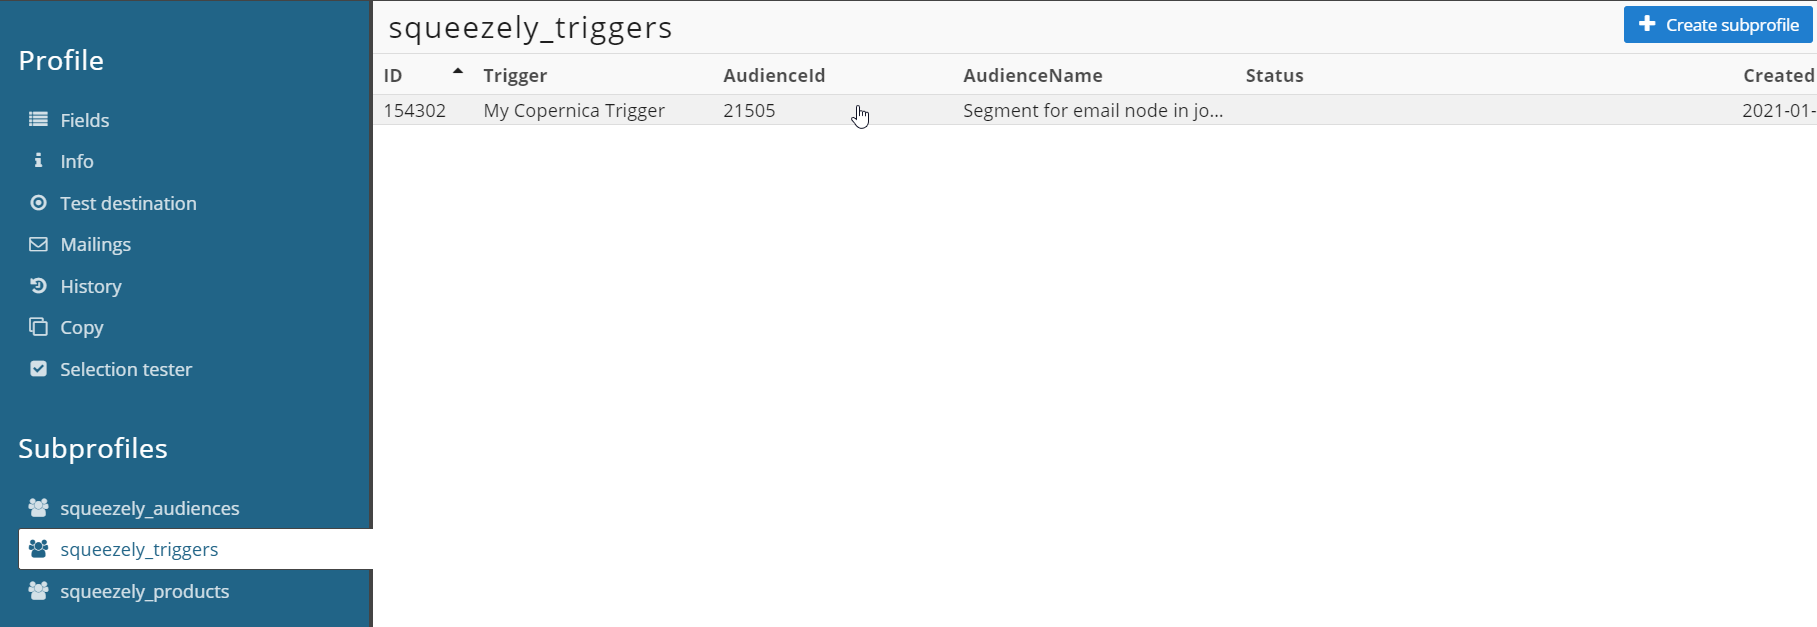
In this overview you will see the following:
ID: the unique trigger id
Trigger: the name of the trigger in Squeezely
AudienceId: the id of the journey segment in Squeezely
AudienceName: the name of the segment in Squeezely
Status: an empty line
Created: the time of the trigger
In the field 'Products' you can select a product set. The products from this set will be sent along with the trigger to Copernica and can be used in the next steps.
In Copernica, the API call will be processed in the 'Squeezely products' collection in the subprofile:
In Copernica, go to 'Profiles'.
Open the Copernica database that Squeezely synchronizes data with
Click on a profile from the audience
Go to 'Squeezely_products' under 'Subprofiles
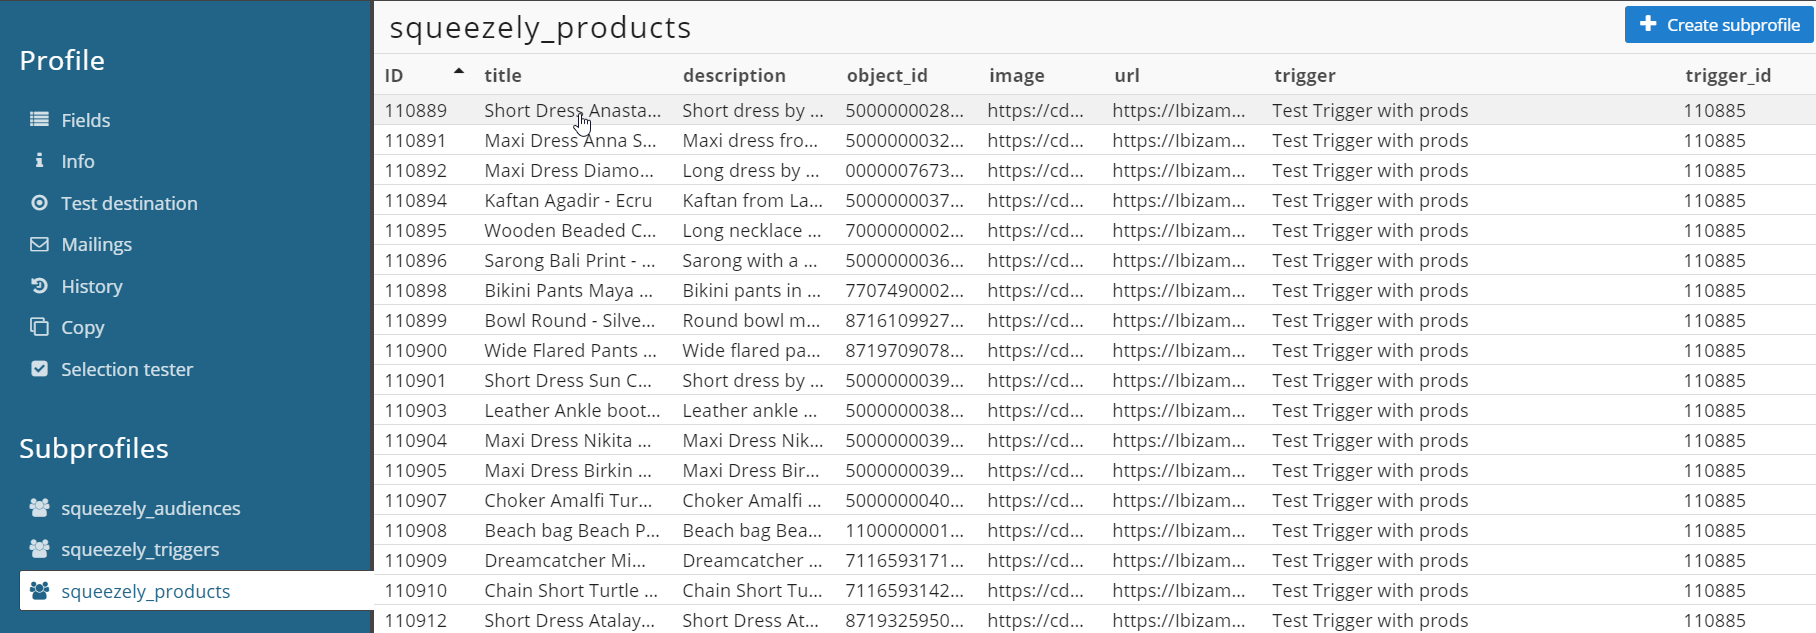
In this overview you will see the following:
ID: the unique trigger id
Title: the title of the product in Squeezely
Description: the description of the product in Squeezely
Object_id: the id of the product in Squeezely
Image: the url of the image in Squeezely
Url: the url of the product in Squeezely
Trigger: the name of the trigger with which the products are sent
TriggerId: the id of the trigger with which the products are sent. Products with a matching id belong to the product set in Squeezely.
2. Triggering a template
With the field 'Mail / template' you can directly trigger a template in Copernica. When profiles reach the email trigger and meet the conditions, Copernica will send the selected template to them.
You can check the status of the trigger in Squeezely as follows:
Go to 360° Profilesin Squeezely
Find the profile that has reached the email trigger in the journey
Go to 'Automations' in the profile
In this overview you will see the following:
Created at: the time when the trigger was created
Contact id: the ID of the profile in question
Campagin/Journey ID: the ID of the specific journey
Buffer endtime: the time at which the trigger was sent to Copernica
Handled: whether the trigger has been handled in Squeezely
Sent: whether the trigger has been sent to Copernica
Channel: the channel that is triggered
In Copernica the API call will be processed under 'Squeezely triggers' in the subprofile:
In Copernica, go to 'Profiles'.
Open the Copernica database that Squeezely synchronizes data with
Click on a profile from the audience
Go to 'squeezely_triggers' under 'Subprofiles
In this overview you will see the following:
ID: the unique trigger id
Trigger: the name of the trigger in Squeezely
AudienceId: the id of the journey segment in Squeezely
AudienceName: the name of the journey segment in Squeezely
Status: in case of a trigger this is indicated by an empty line
Created: the time of the trigger
You can add a product set based on an RSS feed to the template.
Go to Product Sets in Squeezely
Click on the three dots behind the desired product set and then on RSS feed
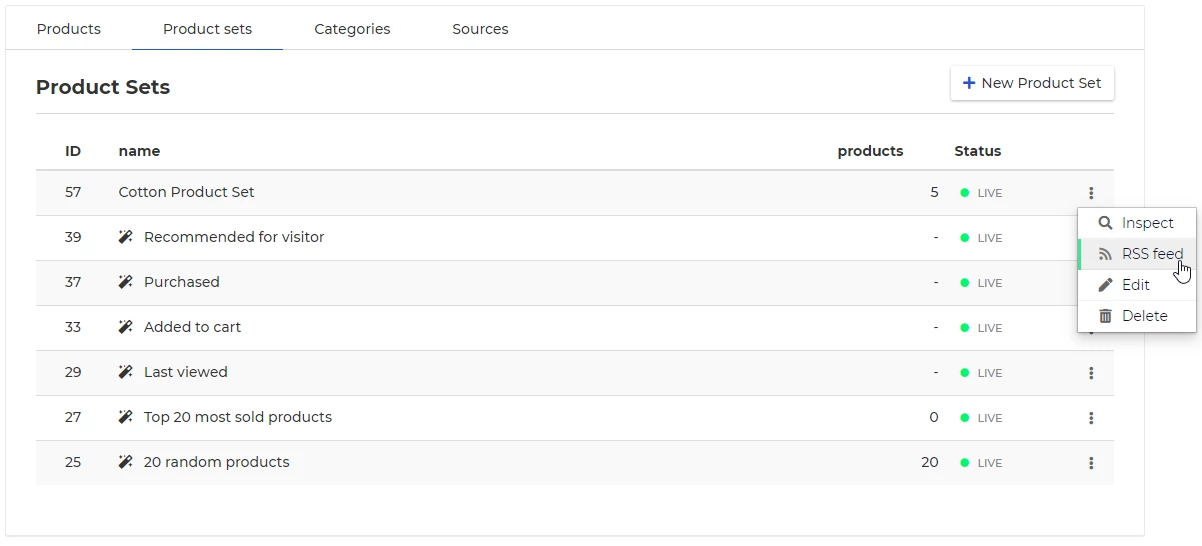
Copy the link for the RSS feed
You can add a product set based on an RSS feed as follows:
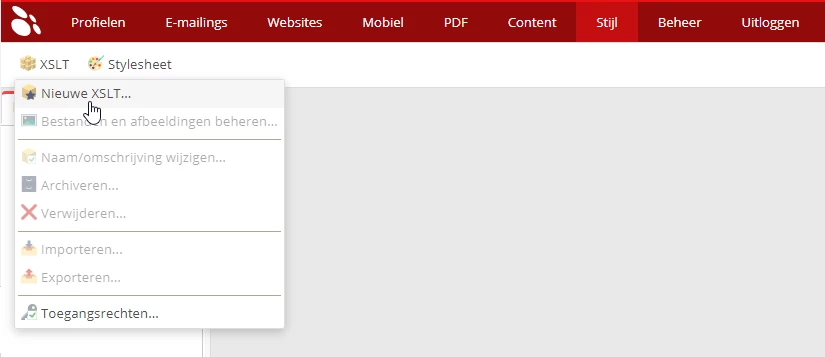
Open Copernica Publisher
Navigate to 'Style' and click 'New XSLT'.
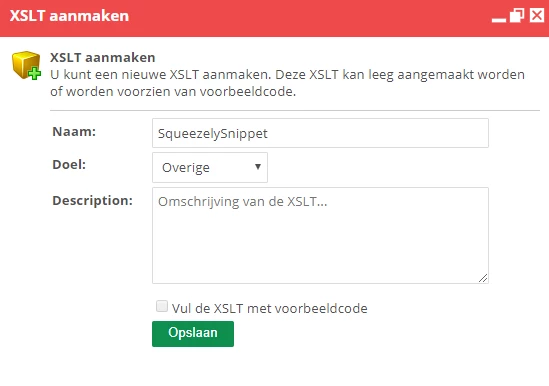
Change the XSLT settings to the following settings and click 'Save
Paste the code below into the XSLT (for showing three products in this case) and click 'Save
  <xsl:stylesheet version="1.0" xmlns:xsl="http://www.w3.org/1999/XSL/Transform">
 <xsl:template match="items">
  <xsl:call-template name="item" />
 </xsl:template>
 <xsl:template name="item">
  <xsl:for-each select="item">

     <table align="left" class="mcnTable" border="0" cellpadding="0" cellspacing="0" width="198" style="margin-top: 10px;">
            <tr>
                <td>
                    <table border="0" cellpadding="0" cellspacing="0" width="100%" style="">
                        <tbody>
                        <tr>
                            <td valign="top">
                                <table align="left" border="0" cellpadding="0" cellspacing="0">
                                    <tbody>
                                      <tr>
                                        <td style="text-align: left">
                                          <a href="{url}" target="_blank">
                                            <img class="mcnImage" src="{image}" width="162" style="max-width: 200px; min-height: 162px; border: 0;height: auto;outline: none;vertical-align: bottom; margin: 0 0 10px 10px;" /></a>
                                        </td>
                                      </tr>

                                        <tr>
                                          <td style="color: #202020;font-family: Helvetica;font-size: 16px;line-height: 150%;text-align:left; vertical-align: top"
                                              width="164" height="32" valign="top">
                                            <div style="overflow: hidden; font-size: 14px; margin: 0 0 5px 10px;">
                                              <a title="Shop Now" href="{url}" target="_blank" style="font-weight: 500;letter-spacing: normal;line-height: 100%;text-align: left;text-decoration: none; color: #333; font-size: 13px;">
                                                <xsl:choose>
                                                          <xsl:when test="string-length(name) > '40'">
                                                              <xsl:value-of select="substring(name, 1, 40)" disable-output-escaping="yes" />...
                                                          </xsl:when>
                                                          <xsl:otherwise>
                                                              <xsl:value-of select="name" disable-output-escaping="yes" />
                                                          </xsl:otherwise>
                                                      </xsl:choose>

                                              </a>
                                            </div>
                                          </td>
                                       </tr>


                                            <tr>
                                                <td style="font-family: Helvetica;font-size: 16px;line-height: 150%;text-align: left; font-weight: bold;" width="164" >
                                                    <a href="{url}" style="color: #555;text-decoration: none; margin: 0 0 0 10px;" target="_blank"><span style="text-decoration: none; font-size: 15px;">
                                                            <xsl:value-of select="currency_sign" disable-output-escaping="yes" /><xsl:value-of select="price" disable-output-escaping="yes" />
                                                        </span></a>
                                                </td>
                                            </tr>


                                            <tr>
                                                <td style="font-family: Helvetica;font-size: 16px;text-align: left;" width="164" height="53" valign="top">
                                                  <a href="{url}" style="color: #555;text-decoration: none; margin: 0 0 0 10px; font-size: 12px;" target="_blank">
                                                      <xsl:choose>
                                                          <xsl:when test="string-length(description) > '55'">
                                                              <xsl:value-of select="substring(description, 1, 60)" disable-output-escaping="yes" />...
                                                          </xsl:when>
                                                          <xsl:otherwise>
                                                              <xsl:value-of select="description" disable-output-escaping="yes" />
                                                          </xsl:otherwise>
                                                      </xsl:choose>
                                                  </a>
                                                </td>
                                            </tr>


                                            <tr>
                                                <td class="btncontainer" style="font-family: Helvetica;font-size: 16px;line-height: 150%;text-align: center;"
                                                    width="164">
                                                        <table class="btncontainer" border="0" cellpadding="0" cellspacing="0" role="presentation" style="border-collapse:separate; line-height:100%; margin: 10px 0 0 10px" width="164">
                                                            <tbody>
                                                            <tr>
                                                                <td align="center" bgcolor="#2e74f5" role="presentation" valign="middle" style="border:none; border-radius:3px; padding: 10px; background:#2e74f5">
                                                                    <a href="{url}" target="_blank" rel="noopener noreferrer" data-auth="NotApplicable" style="background:#2e74f5; color:#ffffff; font-family:Arial,sans-serif; font-size:15px; font-weight:normal; line-height:120%; margin:0; text-decoration:none; text-transform:none; ">
                                                                        Shop now
                                                                    </a>
                                                                </td>
                                                            </tr>
                                                            </tbody>
                                                        </table>
                                                </td>
                                            </tr>

                                    </tbody>
                                </table>
                            </td>
                        </tr>
                        </tbody>
                    </table>
                </td>
            </tr>
        </table>
  </xsl:for-each>
 </xsl:template>
</xsl:stylesheet>
|
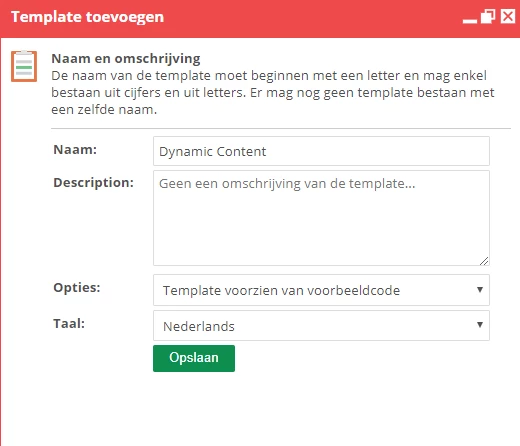
Navigate to 'Mailings' and click on 'Template
Create a new template with the following settings:
Name: the name of the template
Description: a possible description of the template
Options: template with example code
Language: the desired language of the template
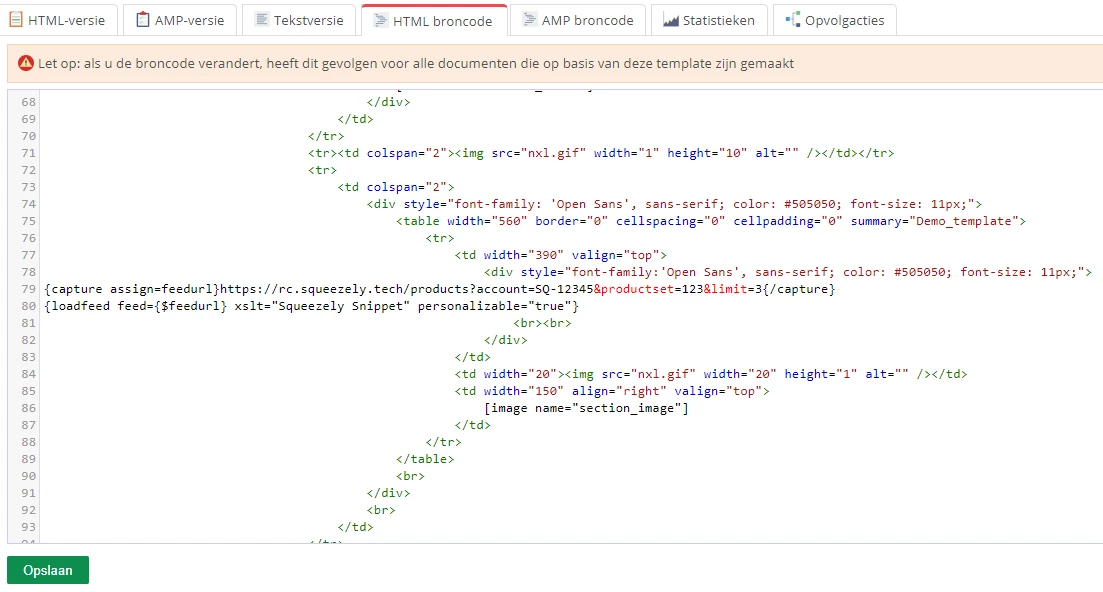
Go to HTML source code
Adjust the content of the code below with:
{accountid}: the Squeezely account id (go to Settings in Squeezely and see Account ID)
{productsetid}: the id of the product set you want to use (go to Product Sets in Squeezely and see ID)
{emailaddress}: the parameter of the email address in Copernica (in case of a personalized product set)
{productlimit}: the maximum number of products that will be shown
{XSLTName}: the name of the XSLT created
![]() View the RSS feed of the product set.
View the RSS feed of the product set.
{capture assign=feedurl}https://www.squeezely.tech/products?account={accountid}&productset={productsetid}&email={emailaddress|escape:'url'}&limit={productlimit}{/capture}
{loadfeed feed={$feedurl} xslt="{XSLTName}" personalizable="true"}
|
Add the code to an element:
Click on 'Save'.
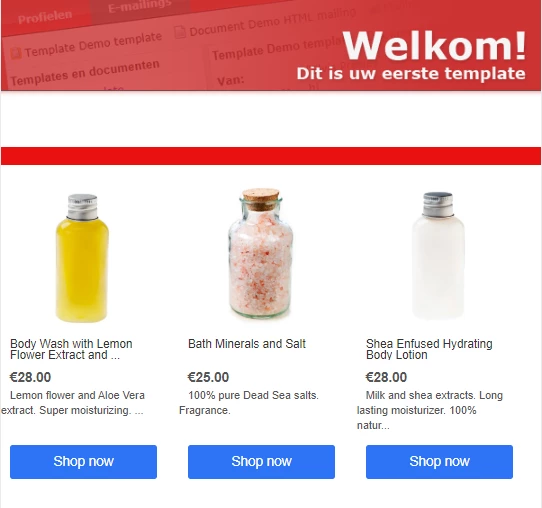
Go to a document based on this template and view the result: