Journey Builder
Journey Builder
Creating a journey helps you to make use of incoming events to trigger actions for your customers. By using 'split objects' we can direct customers into different lanes, creating a 1-to-1 approach for each customer that enters a journey. In this guide we will have look at the following topics:
Example Journey
In our example journey below, you can see a basic setup of a journey.
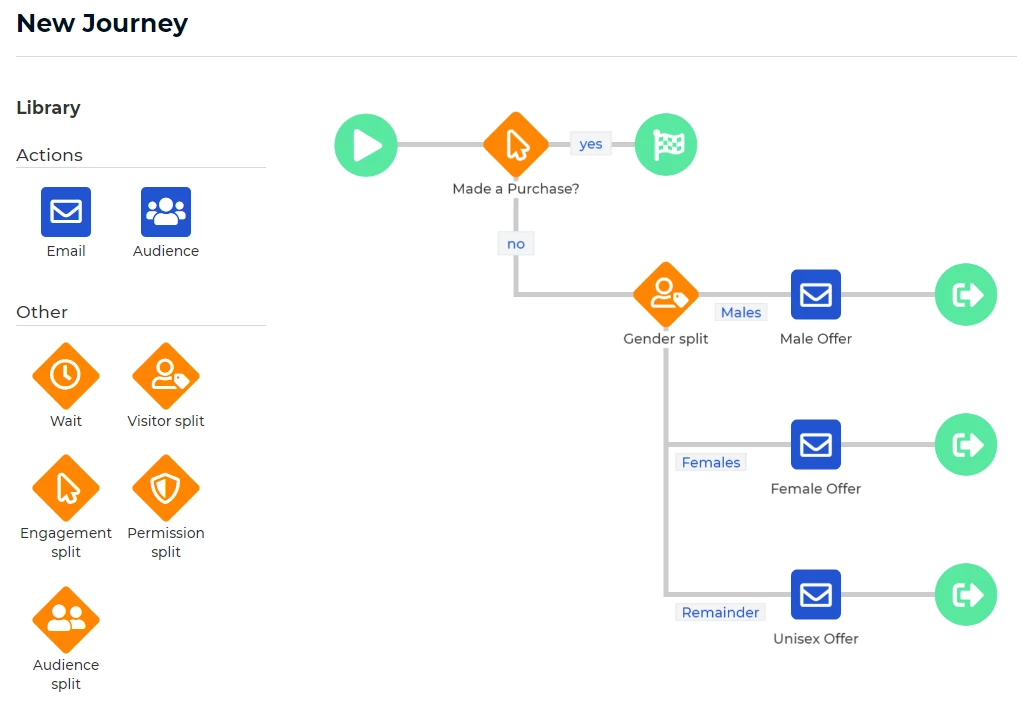
In this example case, the following steps are executed:
- All website visitors join the journey and proceed to an 'Engagement Split'
- After waiting 1 day, the 'Engagement Split' object checks if a purchase has been made.
- If this is the case, the customer is moved to the 'Goal' node. No further action is required.
- If no purchase has been made, customers move on to the 'Visitor Split' object.
- The 'Visitor Split' checks the customer profile for the value in their gender field.
- Based on the properties 'male' , 'female' and 'Remainder' three lanes are created.
- Each lane receives a personalized email for their situation.
Setting up your Journey
Create a new journey by navigating to Data > Journeys in Squeezely platform and click on 'New Journey'.
This will prompt a settings screen, where you will be able to give your journey a name.
Entry Targetting
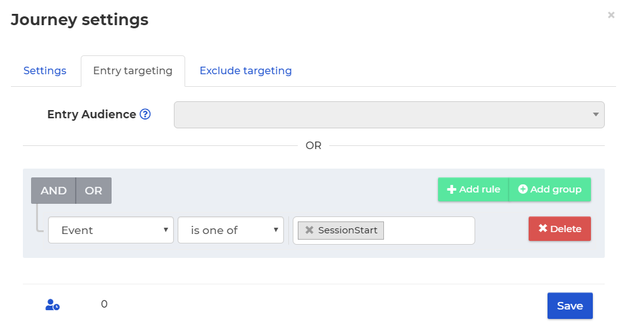
After selecting a name for your journey, move on to setting the criteria on which a user may enter your journey. This can be done on the 'entry targetting' tab in the setup screen.
Within the entry targeting there are two options:
- Use an existing audience
This will allow you to use any website audience. Any customer that meets the criteria set in your audience will be allowed into your journey. Select an audience using the drop down menu. - Use the rule builder
The rule builder will give you the opportunity to create rules on which a customer may enter your journey. In below example we use 'Event' is one of 'SessionStart'. This will put anybody that has started a session on your website into the journey. By using different rules you can easily manage different journeys for different actions and audiences.
NOTE: People will only be placed into your journey after you publish it. People that were in your audience before publishing do not get entered in your journey, unless they meet the criteria again.
Not sure where to find the setup screen? Click the green 'play icon' at the start of your journey to access the screen.
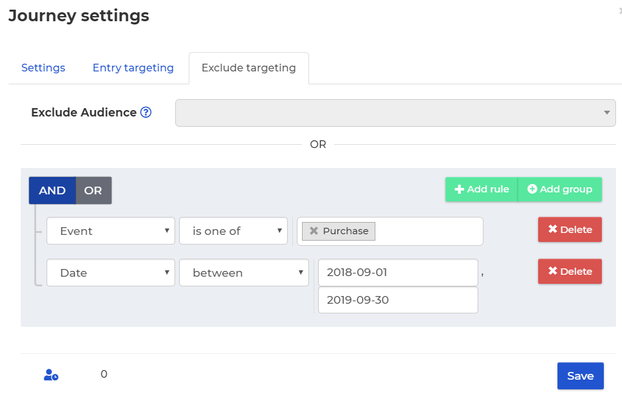
Exclude Targeting
When managing which customers can enter your journey, it's possible to exclude certain customers from entering as well. Do this using the tab 'exclude targeting'.
Again you have two options:
- Use an existing audience
This will allow you to use any audience. A customer that meets the criteria set in your audience will be prevented from entering into your journey. Select an audience using the drop down menu. - Use the rule builder
The rule builder will give you the opportunity to create rules on which a customer must be excluded from your journey. In below example we use 'Event' is one of 'Purchase' AND Date between 1 and 30 September 2018. This exclude anybody that has made any purchase in September of 2018 from entering your journey.
Goal Audience
Within your journey settings, you will find an option to set up a Goal Audience. When people reach the end of your journey, you will be able to determine if they reached the goal for this journey. If yes, they will be put into the Goal Audience. The goal audience has two applications:
- It can be excluded from entering your journey again. Set this by switching the toggle to active, as in the example below.
- It can be synchronized to external channels. Set this up by selecting the channels you want to use for exporting to. In the example below Facebook and Google Adwords have been selected.

Journey Objects
Use journey objects by dragging them to the appropriate place on your journey canvas.
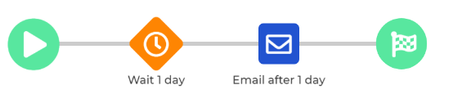
Wait Object
When a customer is added to a wait object, they will remain there until the wait period is over. Within the Wait Object you will be able to set days, hours and minutes to determine the total wait period.
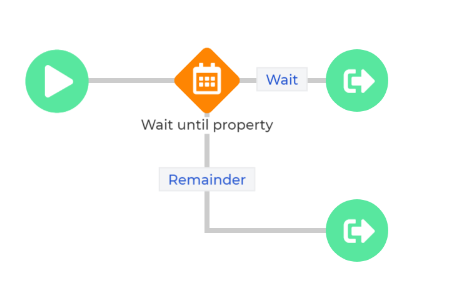
Wait until Date
The wait until date node will make sure your user will remain in this node until a certain date criteria is met. You can use a static date, or instead use a date from a contact property. In case you are using a date from a contact property, you will be offered to choose an amount of days relative to the data found in the contact property. This will allow you to send an email on somebody's birthday, but also a set amount of days before or after the date found in the contact property.
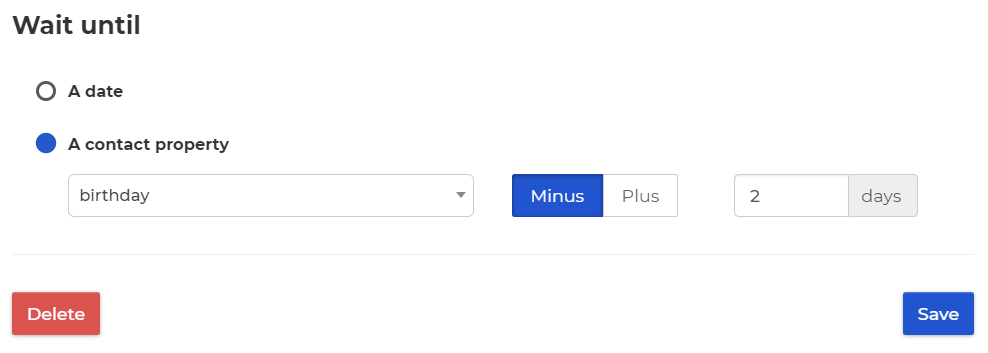
When the date setting is met, your contacts will pass to the next node. In case the date found in your date property is empty, or is in the past we will add people to the remainder path. An exception to this rule is the birthday field. For this field, we will ignore the year value so you can trigger actions every year the birthday occurs.
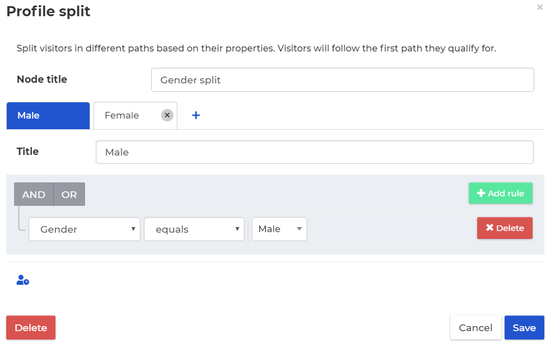
Visitor Split
The Visitor Split object will use data from the customer profile to send customers into different lanes. The below example shows you how customers are divided into three lanes based on their gender. In case no value has been set for gender, a customer will be moved to the 3rd path 'remainder'.
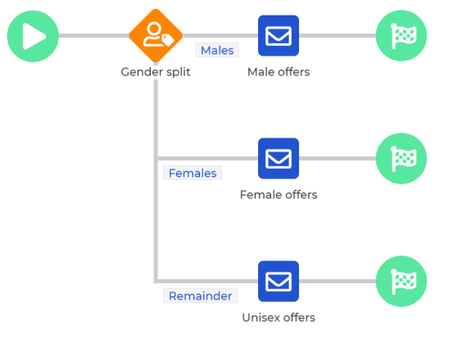
A visitor split can be setup for all profile criteria, like gender, age, country, city, total spent or even privacy consent. On top of this, any custom profile field you have created can be used here as well.
Engagement Split
When a customer enters an Engagement Split, the following will happen:
- They will remain in the engagement split node during the engagement period.
- When the engagement criteria are met, they will immediately be moved on to the 'yes' lane.
- When the engagement period expires, and no engagement has happened, customer is moved to the 'no lane'
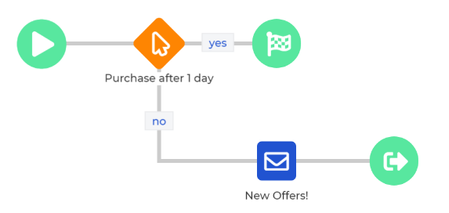
In below example all customers that make a purchase are moved straight into the goal audience. Customers that did not make any purchase within the engagement period automatically receive an email.
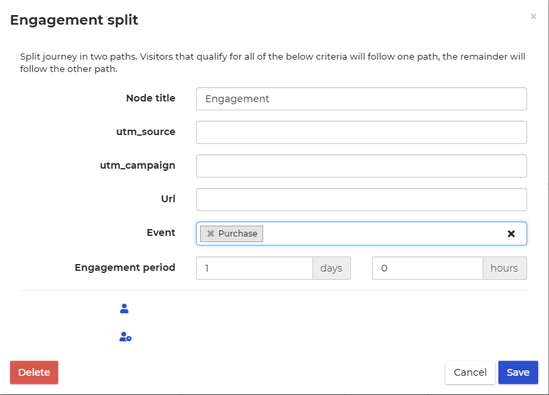
Within an engagement split, several engagements can be defined.
utm_source: Any utm_source tag that a user must visit to qualify for the engagement.
utm_campaign: Any utm_campaign tag that a user must visit to qualify for the engagement.
URL: Any (part of) a URL that a user must visit to qualify for the engagement.
Event: Any event, like AddToCart or Purchase can be used as the engagement.
Finally an engagement period can be setup.
Audience Split
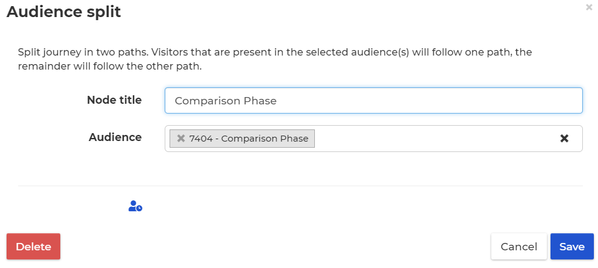
When more advanced rules are required to determine which users may proceed to each lane, the Audience Split can be used. When a customer moves through an audience split, the journey builder will determine if the customer is in the audience or not. If so, customer proceeds to yes. If not, customer proceeds to no.
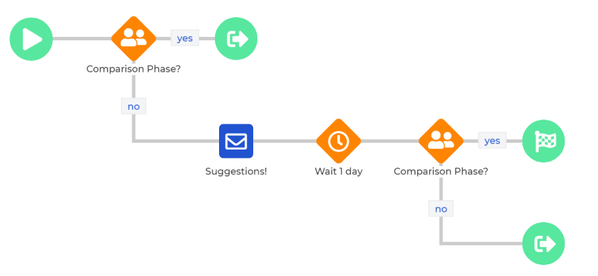
The example below shows a journey where all customers in the 'orientation phase' enter into the journey. Following the entry, the Audience Split is used to find out if they have not already moved on to the comparison phase. If not an email will be triggered within the no lane.
After receiving the email, a 'wait object' will hold the customer for one day, after which the customer hits another Audience split. Again it is determined if customer has successfully moved on to the 'comparison phase'. If so, the journey's goal will be reached. If not, the customer exits the journey.
Using an Audience Split only requires you to drag the object on to the canvas and select the desired audience from the drop down menu.
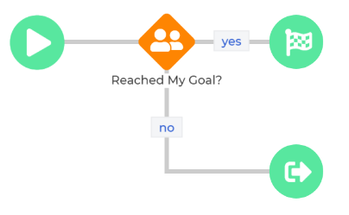
Journey Exit
All journeys come to an end. This is where we determine if the journey was a success. By clicking on the exit node, you will be able to use a simple toggle to determine if customers that end up here have reached the goal. If so, they are placed into your goal audience. If not, the are removed from the journey.
Journey Actions
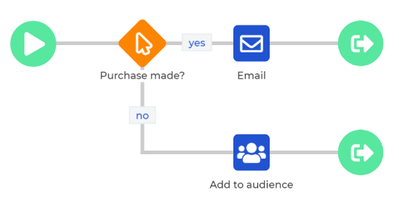
Within a journey you can trigger different actions. For example you are able to send an email to a customer or add (or remove) a customer to an audience. In the example below every customer that has made a purchase will be sent an email, while everybody that didn't purchase will be added to an audience.
Using Email actions
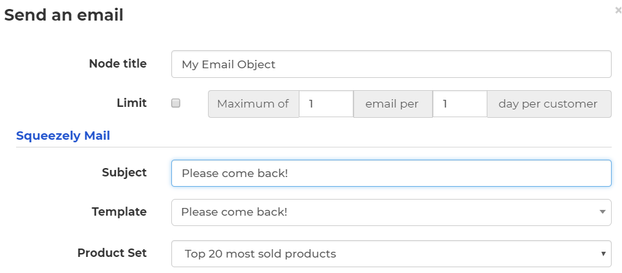
To add an email action to your journey, just drag it to the appropriate place on your journey canvas. This will open the below screen and settings:
Node title: Change this to rename the name of the action on your journey canvas.
Limit: Using limit, you will be able to specify the maximum number of times this specific email can be sent to a customer in a certain time frame.
Subject: This subject will be used to send your automation.
Template: Select the template you want to use for this email action.
Product Set: Select a product set that you want to send along with your email action. Products in the product set can be used to personalize your email template.
Using Audience Actions
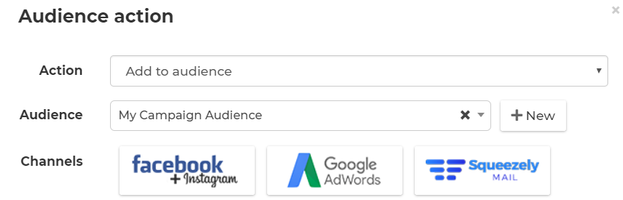
To add an audience action to your journey, just drag it to the appropriate place on your journey canvas. This will open the screen below and settings:
Action: Select either 'add to audience' or 'remove from audience'
Audience: Select any existing audience from the dropdown to add / remove the customer to / from.
New: Use the button 'New' to create a new audience for this audience action.
By using the channel buttons you will be able to determine if the audience needs to be synced with any of your connected external platforms.
Using Webhooks
Using webhooks you are able to send data to external systems as it occurs in Journey Builder. It requires that the external system you are using is able to receive data from webhooks. In the interface below, you are able to configure where exactly the data should be sent by Journey Builder.
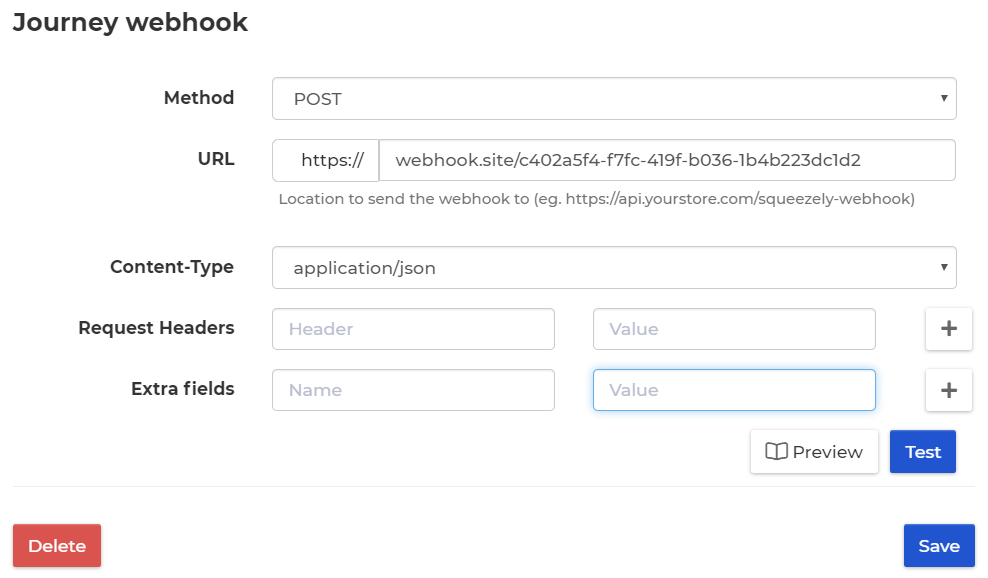
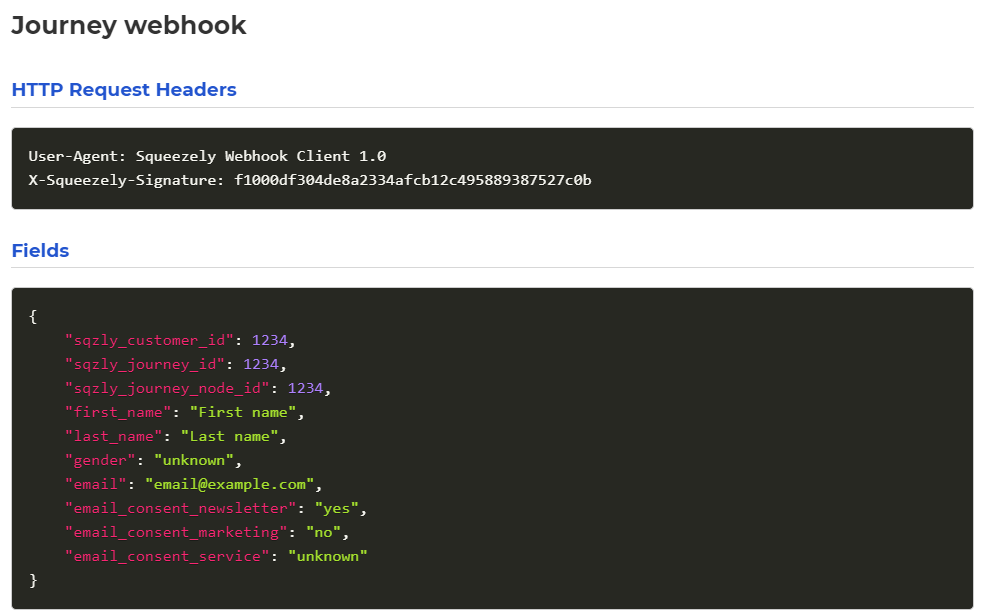
Once a contact reaches the webhook node, the information below will be sent to your configured address.
Search
Navigate
Want to find info about a specific feature? Check out these topics below!